Bare Metal Space Invaders
Table of Contents
Introduction
Bare metal programming is programming on hardware without an Operating System. In this post, I will share some of the learning I gained after programming a Space Invaders-like game in Rust. The game can run on a desktop or on Raspberry PI 3B+, and it comes with zero dynamic allocations.
The plan for this post is as follows: first I will briefly explain how the project is set up and how cargo is used to nicely decouple the operating system code from the game code. Then I will talk about implementing Space Invaders in Rust. It turns out that game development is complicated! In the last part, I will dive into the details of the basic units that were implemented in order to support the game on a bare metal. I will also talk about strategies used to improve the code speed and reach a good frame rate.
After reading this article, I hope you will gain a deeper understanding of writing unsafe Rust, embedded systems, and what it takes to write your own kernel. I do not assume any prior knowledge of unsafe Rust or operating systems implementation, though it would be helpful to better understand the article. In the end, I have also posted some resources that I have collected while putting this project together, as well as some additional resources that could help you get started on undertaking similar projects.
I hope this project can inspire you to writing your own kernel or bare metal program!
The code for this project can be found on GitHub.
Demo
This game is running on a Raspberry Pi 3B+ and connected to my monitor with an HDMI cable:
Goals of this project
I've been writing an Operating System (OS) in rust on the side for a while now. The problem with it is that the scope is pretty broad. It's also very hard to define when it's "done". On the other hand, writing a game on bare metal has significant advantages. It has a clear scope and can be considered complete. This project started as a side project of my operating system Iris OS.
The goals for this project are:
- Write a game for Raspberry Pi on bare metal.
- Improve my knowledge of Operating Systems and embedded programming.
- Enhance my understanding of (unsafe) Rust.
As a side effect, I also gained more knowledge on how to write games. 🙂
Bare Metal programming
Programming on bare metal involves writing a program that will run without an operating system, directly on the hardware. An OS exposes some APIs (system calls) that programs can use to achieve certain tasks.
Some examples include:
- Reading or writing bytes from the disk.
- Getting the time.
- Connecting to a website using a socket.
Not having an OS means that we need to handle all the details of the interaction with the hardware.
Firstly, we need to understand the underlying hardware available and how to interact with it. Normally, this is what drivers are for. There are some interfaces that one could query to get information about the underlying hardware. In this case, because I'm running this only on a Raspberry Pi 3 B+, we already have knowledge about the hardware. This significantly simplifies things.
For example, I know that my platform has 4 cores, so either I park 3 out of 4 cores or I will need to implement a strategy to handle multiple cores.
A "process" can be thought of as a unit of work that gets assigned to any available core using a process scheduler strategy.
Here are more things that the OS does for you:
- Implements the "process" abstraction.
- Manages user processes and assigns them to CPUs.
- Manages the available RAM and allocates memory to each process.
- Takes care of the interrupts.
- Ensures no one is eavesdropping on your memory by using virtual memory.
All of this is also implemented to be as efficient as possible. If the value produced by a computer can be derived from the time that a user-level process is running, when kernel code is running, it's "stealing" useful time.
In bare metal programming, you don't have all of these nice features. It really depends on how complex your program needs to be. As we shall see later, Space Invaders was implemented without many of these features. The main reason why this is possible is because we're running a single, specialized program.
I believe bare metal programming is mostly used in embedded systems.
Space invaders
This game was released in 1978, way before my birthdate. It's a fun and challenging game that was initially developed for arcades. At this point, there are a lot of variations, but mine is inspired by the original one:
As we destroy more enemies, they start getting faster and faster. Interestingly, this was not explicitly coded in the initial version of the game but was a side effect of having less computation to undertake (hence the game loop was able to run faster).
While programming the game, Nishikado discovered that the processor was able to render each frame of the alien's animation graphics faster when there were fewer aliens on the screen. Since the alien's positions updated after each frame, this caused the aliens to move across the screen at an increasing speed as more and more were destroyed. Rather than design a compensation for the speed increase, he decided that it was a feature, not a bug, and kept it as a challenging gameplay mechanism. Wikipedia
This twist made the game more fun and challenging!
Project structure
When implementing something without an underlying operating system, you are not allowed to use the rust's standard library. This is due to the fact that the standard library makes use of system calls. System calls are API offered by the Operating System. No OS, no system calls no standard library. When writing a rust program, we can opt out from using the standard library by using a #[no_std] macro.
When going no_std, you cannot even use the rust's testing framework, which can be annoying. Also, testing our game on hardware on every iteration is very time-consuming. The path I decided to follow is to implement the project in two crates:
- space invaders crate: implements space invaders. It is added as a dependency to the kernel crate which runs it in the kernel's main() function.
- the kernel crate: a binary that gets compiled and can run on the Raspberry pi.
This division allows implementing each crate independently. If you implemented your own kernel, (I hope) it should not be a big effort to run Space Invaders crate on top of it.
Space Invaders crate comes with std and no_std feature flags.
The Space invaders crate has two features: no_std and std. With std enabled, I've pulled in a dependency that gives you a window with a framebuffer, and was able to "very" quickly build the game. After I was satisfied with the game, I started implementing the kernel part. Doing things top down has its benefit as we shall see later.
Space Invaders implementation
I enjoy playing games from time to time, but haven't spent much time building one. Usually when building a new project, I like having something that works and progressively expand it and add new use cases (see Gall's law). This is still doable in game dev, I believe, but it's very time-consuming. I've often found myself sprinkling magic numbers here and there to make everything work correctly. I'm not saying that it's not possible, but it's rather time-consuming. Especially because as I was testing the game, I found more and more use cases and edge cases.
Game dev
The basic framework for game development is to have for loop, also known as "the game loop"; that does two things:
- run some "business" logic to calculate the next state.
- draw the latest available frame to the framebuffer.
I would like to briefly talk about an important concept strictly related to the game loop that I had to fight with very soon.
Let's assume that we run this big loop 30 times in a second, and we wanted to see our enemy move four pixels per second. Then we could just add 1 pixel every time the loop is run. But what if the loop takes less than 1/4 of a second to run? As we kill enemies, we need to do less work; hence the loop will run faster. This would make our enemies move faster than 4 pixels in a second! Funny enough, this was also the original story behind the fact that in the original game, as you killed enemies, they started moving faster.
But if we want to keep the ratio constant, we need to use the delta milliseconds.
What is delta time
Any time we run the loop, we calculate how much time has passed between now and the previous loop. We need then to use this information to calculate how much distance the enemy has traveled. It's not hard to understand if you remember that
distance (pixels) = velocity (pixels/milliseconds) * time passed (milliseconds)
This poses a small issue because pixels are discrete. Hence, we need to store the coordinates as a f64, but any time we need the actor's coordinates, we need to cast this number to an u32.
Also, the business logic can run "as fast as possible" while the drawing part should run at a certain rate limited speed, say 30 times per second (FPS).
So everything is constantly in movement, and occasionally we draw a consistent scene to a frame.
Actor
An actor is anything that needs to be drawn to the screen and holds some common methods for common transformations. It needs to be called in at least two moments, one during business logic update and the second one during draw.
To draw the barricade, I have manually written the indexes and used rustfmt::skip to see what it looks like:
#[rustfmt::skip]
        const OFFSETS: [(f64, f64); TOTAL_BLOCKS_PER_BARRICADE] = [
                    (1.0, 0.0), (2.0, 0.0), (3.0, 0.0), (4.0, 0.0),
        (0.0, 1.0), (1.0, 1.0), (2.0, 1.0), (3.0, 1.0), (4.0, 1.0), (5.0, 1.0),
        (0.0, 2.0), (1.0, 2.0),                         (4.0, 2.0), (5.0, 2.0),
        ];
I hope you can see the "sprite" of the barricade!

each of these coordinates will get translated to a single block that can be shot away.
FrameBuffer and Double Buffering
I was able to find a nice and simple implementation in rust called "minifb" that gives you access to a framebuffer inside a window, plus some methods to get the user's input. This was super useful when developing in std!
The framebuffer itself is just a big array in which each coordinate [x][y] maps to a pixel in the interface. A pixel is represented as an RGBA using 4 bytes or an u32.
In the game loop, after we calculated the next state and we want to draw it out, it might take some time to render. Let's say we're trying to draw the movement of the shoot from a hero. We will need to set a pixel to white, and the previous pixel to black. This is not atomic, and in between these two operations, the user will see that the shot is 2 pixels long for a very short period of time.
What we can do about this is to use the double buffering technique. We have the framebuffer as "front" buffer and a second "back" buffer. The second buffer is the next frame. After we draw everything in there, we can just replace the back buffer with the second buffer. If the system you're using supports it, it might be sufficient to just swap the two pointers to draw the new interface. In this case, I haven't checked, so I just reset the front buffer (setting everything to zero) and copy the back buffer to it. Spoiler: this had to be improved on the raspberry side. More on this in the performance section.
QA
Even if a function respects some expectations, the final game might still be broken in some funny way. And every time I made a change, I was trying to do some QA. These are some behavior that I was testing:
-
When the game starts, the hero's ship is positioned at the center of the screen, and aliens start on the left, moving to the right.
-
If any alien reaches the bottom of the screen, the game is over.
-
When the hero shoots a shot, it moves upward until it hits an enemy or goes off the screen.
-
When an enemy is hit, both the enemy and the shot disappear.
-
If a shot is fired by an enemy, it can only hit the hero.
-
When all enemies are defeated, the game is over.
-
After a column of enemies is defeated, the remaining enemies can move one column further.
-
Once the game is over, it resets to the starting point.
-
The hero should not surpass the side of the screen.
-
Periodically, an enemy may shoot a shot.
-
Every time an alien is shot, the high score increases.
-
If the player wins, the game resets, and the score is tracked.
-
Barricades are added in front of the hero.
-
Every time an alien is killed, the rest speed up by 2%
and so on! I found this exercise very useful to ensure the quality of the final game, though I should have played more with the original game to make my version closer to it. Therefore, this is my personal flavor of Space Invaders!
To allocate or not to allocate
When we need to make use of the RAM, our program has two strategies: allocate on the heap or on the stack.
Both are their advantages and disadvantages. In garbage-collected languages, you don't spend much time to think about this.
All the memory that we want to allocate on the stack must be known at compile time. For example, we already know how many enemies we want to draw on the screen, so we can store them on the stack. But this array is fixed: as enemies get destroyed, we cannot shrink our array. Hence, if we use a stack allocated structure, we would need to traverse through it fully, regardless of how many of the enemies are alive.
It is important to know that while stack is taken care by your compiler, the heap allocator (or dynamic memory allocator) has to be implemented. When compiling a std program, rust already provides its own memory allocator, but we're free to implement our own for specific use cases (squeeze performance, find memory leaks, etc.).
This game and kernel use only static stack allocations. There are no heap allocated structs like String, Vecs, and so on. This not only helps with performance, but it allowed me to get away without implementing an allocator. More on this in a second.
Kernel Implementation
Before starting, we need to understand which features we will need to implement in order to be able to run space invaders.
First of all, we don't need a user space. The game can safely run in kernel level. If we had the game running in user space, we would basically be implementing unikernels.
We don't need user space because we're running only a single "thing". User space gives you isolation, safety, portability and more. In user mode, different processes can't see each other's memory. If you run everything in kernel mode, everything can read and write everything, which is not ideal if you're planning to run some untrusted code. This is also the reason why kernel modules can crash your system and eBPF is so cool!
In order to get a framebuffer, we need to talk to raspberry pi's GPU. To do so, there is a cool interface called mailbox. We need to implement a driver to use it to send messages and receive responses. The Raspberry's GPU is a closed source, but it is basically running its own operating system. When the kernel boots up, it's start running the instruction at address 0x80_000. This is after the GPU has completed its own initialization.
For the stack, we can use 0x80_000 as a stack pointer, and the stack will keep growing downwards.
We also need a driver to use the UART. UART is just a serial interface that allows to transfer data. Raspberry comes with a mini uart and a full-blown pl011 compatible uart. We will use the latter. The serial interface is used as "standard output" for our prints and to take the input from the user.
Finally, we need to implement a small interface to get the readings from the timer.
To recap:
- mailbox for the framebuffer
- uart: keyboard input and prints output
- timer: to get the delta time
Potentially, I could add some apcpi support to allow the shutdown of the system, but the idea is that as soon as the system boots up it will run space invaders in an infinite loop.
Logging
Inside the space invaders crate, I needed to do some println!() calls for debugging reasons. It's always nice to know that something is happening. println!() is a macro which gets replaced with a std call. It is in fact not available in no-std. Inside the kernel code, I already had a println! Macro that would write to the serial port. So ideally, my space invaders lib would have println! Calls, and would let the user of the library decide which implementation to use: std in case I wanted to run it on my laptop or my kernel's in case I wanted to run it on raspberry pi.
After scratching my head for a moment, I realized that this is exactly what the rust's log library is doing! Thankfully, implementing a logger is quite easy. The only caveat is that I had to use ``log::set_logger_racy(self`) to make it work. I've not yet investigated what's up with that, but after reading the Safety requirements, this should be a safe usage. The logging happens using the UART serial. The UART gets initialized once at the start of the program, and then it can be used to send and receive bytes.
Allocator
An allocator can be created by implementing the GlobalAllocator trait which comes with two functions:
unsafe fn alloc(&self, layout: Layout) -> *mut u8;
unsafe fn dealloc(&self, ptr: *mut u8, layout: Layout);
In the initial phase, I implemented a bump allocator which operates according to the following algorithm: A pointer to the current head of the heap memory is maintained. Upon invoking the 'alloc' function, the head is shifted to 'layout.size', and the previous pointer is returned. On the other hand, when the 'dealloc' function is called, no action is taken, resulting in a technical memory leak.
You might be thinking that we will run out of memory at some point, and you would be absolutely correct! Bump allocators work well as long as you already have information about the amount of memory you'll need to allocate. In real-life scenarios, bump allocators have their own place as highly efficient allocation mechanisms. If your need revolves around swift execution with minimal additional tasks and you are aware of the exact memory requirements, opting for a bump allocator might be a suitable decision.
To use a dynamic allocator In Rust, we can apply the #[global_allocator] macro to a static object that implements the Global Allocator trait.
This enables us to make use of the contents of the alloc crate, such as Vec, String, and others!
I wasn't really performing any allocations in the game; however, in the end, I still needed an allocator to align the sprite images to an u32 to prevent encountering Undefined Behavior.
The sprites are encoded as RGBA, so using u32 is not only more straightforward but also much faster. To get an RGBA bitmap out of an image, it was sufficient to open it with GIMP and export/save as "data" file leaving all the default options.
Having a linker script, I considered trying to align the sprites to u32 there. However, this approach leaves the potential for std to remain misaligned. Fortunately, I stumbled upon this nice macro that extends the functionality include_bytes!(), and enabled me to eliminate all the remaining allocations. I made a few adjustments to obtain a &[u32]:
#[macro_use]
mod macros {
    #[repr(C)] // guarantee 'bytes' comes after '_align'
    pub struct AlignedAs<Align, Bytes: ?Sized> {
        pub _align: [Align; 0],
        pub bytes: Bytes,
    }
    #[macro_export]
    macro_rules! include_bytes_align_as {
        ($align_ty:ty, $path:literal) => {{
            // const block expression to encapsulate the static
            use $crate::macros::AlignedAs;

            // this assignment is made possible by CoerceUnsized
            static ALIGNED: &AlignedAs<$align_ty, [u8]> = &AlignedAs {
                _align: [],
                bytes: *include_bytes!($path),
            };

            let as_u8 = &ALIGNED.bytes;
            // safety: the alignment is guaranteed by the above const block expression
            unsafe { core::slice::from_raw_parts(as_u8.as_ptr().cast::<u32>(), as_u8.len() / 4) }
        }};
    }
}

// usage:
pub static ENEMY_SPRITE: &[u32] =
						crate::include_bytes_align_as!(u32, "../../../assets/alien.data");
I could have also gone with a [u8] and written them in sets of four, but this approach is much more convenient and offers better performance!
At this point, as far as I was concerned, an allocator was not needed anymore.
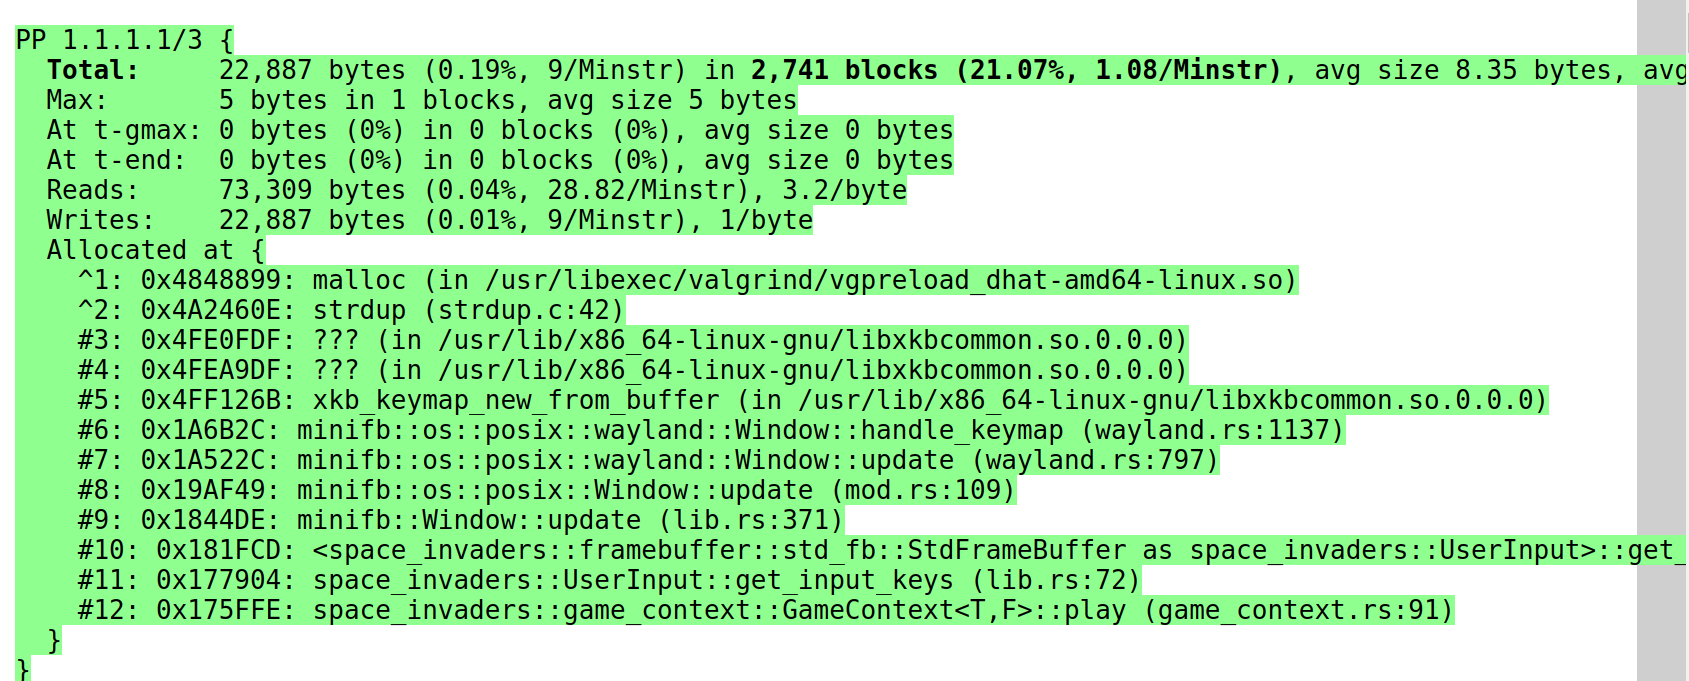
One aspect that proved rather bothersome is that if you attempt to remove the Global Allocator, and if there's an element like a crate or a format!() function that relies on alloc, the Rust compiler will raise an error regarding the absent allocator, but it won't tell you why one is necessary. If the alloc pinpointing the exact dependency can become quite vexing. One potential resolution when alloc is concealed within your dependencies is to retrieve all of them and conduct a search for "alloc". Usually when a crate needs to the alloc create, it's usually well advertised in their README. In this case, a format!() used to write the score string was forcing me to keep the allocator around.
To pinpoint the alloc usage, I tried valgrind's dhat tool. It's pretty neat, though in this case it did not directly point out the issue. After installing the dependencies I run it like this valgrind --tool=dhat target/debug/space_invaders; this generates a dhat.out.strdup function, which was a good enough hint for me. This book section has more info on this tool. This is a sample for single trace:
Dear GPU, I hope this Request finds you well.
The mailbox interface is mostly undocumented hardware. Thankfully, the property interface is defined and comes with a lot of goodies, and a few of them I needed to use.
It works like this: the mailbox is memory-mapped, and among others, it has 3 registers that interest us - write, read, and status.
First, you create a buffer with some format described on the wiki page. After checking using the status register that the mailbox is not full, we can write the address to our request struct in the write register.
When the GPU has completed the response, the read register will contain our request's address, and the status register will change to not empty. But now the struct will contain the GPU's response, not our request anymore.
The format of the request looks like this:
u32: total buffer size in bytes.u32: should be 0x0 for requests.- [all our tags]
u32: all0x0- the end tagu8: additional padding needed to align to u32.
This is just some convention we need to follow when writing tags. Tags are the actual requests for service we're asking the GPU.
It took me some trial and error to get some of these messages right. I've only added functions to add specific services I needed, the most important being the framebuffer.
Timer
Raspberry Pi 3B+'s BCM2837 ARM CPU comes with two timers: one is the Arm Timer, and the other is specific to this CPU (Broadcom). These timers start ticking when we connect the power. For a full operating system, timers are vital to implement preemptive scheduling. Before switching to userspace, the kernel will register an interrupt that will tick in a fixed amount of time (called quanta). When handling the interrupt, the kernel will allow the scheduler to run and decide which unit of work to allocate next on this CPU. In my case, I don't have the concept of a "process" or "thread" but I still need a timer to calculate the delta milliseconds.
The specification on how to use this timer is described in the document called "BCM2837 ARM Peripherals," chapter 12, page 172. It uses memory-mapped IO. The important registers are two u32 that together give us the microseconds since boot.
Because this involves a read_volatile and a couple of shifts to get the u64 right, this operation is quite efficient.
Random
At this point, you might be wondering why I did not mention the driver to implement random, used, for example, to decide when our enemies should be shooting.
One could, for example, decide to implement a pseudorandom number generator, but even for that, I would still need a "random" seeding number.
Raspberry does come with an RNG generator. But I've decided to get away with implementing it by simply having a fixed array of 10 numbers with some random values. In each iteration, we select the next number and choose an alive enemy from the list of alive enemies. This is chosen to shoot in the next loop.
Why 10? It seemed enough.
Why not implement a driver for random? I do have this driver already implemented for my OS. But I've decided not to do it to keep the game fast and the overall code simple.
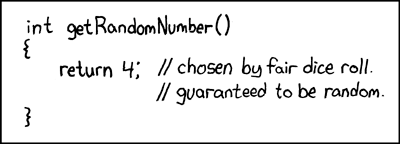
The RNG requires entropy, so every time we ask for a random number, we need to wait for some entropy. So ideally, I should have probably also included an implementation for an RNG. I have written an implementation for the famous MT19937 RNG here, but again, I did want to keep the code as small as possible. Let me know if the random doesn't feel enough random! And here's the obligatory xkcd:
UART
The UART (Universal Asynchronous Receiver/Transmitter) is a chip that handles the serial port communication. The driver was taken from the excellent rust-embedded tutorial. The specification can be found on the document "PrimeCell UART (PL011) Technical Reference Manual" r1p5.
Booting up
When the Raspberry is powered up, the GPU starts and initializes everything. When it's ready, the CPU will start executing the instruction at address 0x80_000. The initial boot script is written in assembly in boot.rs. Raspberry has 4 cores. Because it's a Symmetric Multiprocessor, all cores start running the instruction stored at address 0x80_000. For the game, I only needed one core. There is a special instruction called "mrs" to read the coprocessor data. I've used it to get the current core ID, and to park 3 out of 4 cores.
The "bss" (block started by symbol) section of memory is used for static variables that are not initialized with any value and is supposed to be zeroed out. The standard convention is that the operating system or runtime initializes this memory to zero before the program starts executing. If you were to rely on variables in the bss section being initialized to specific non-zero values, it could lead to undefined behavior because those variables might contain arbitrary data. This can lead to unpredictable results in your program. Zeroing out the bss section helps ensure that the program behaves consistently.
The memory can be allocated on the stack or on the heap. Usually the heap grows from lower numbers to higher numbers, and the stack is the opposite. Because our code starts at 0x80_0000, we can use this address for the stack pointer register. The Stack will keep growing to 0.
Other than zeroing out the bss, the assembly is also setting up the stack pointer. And this is enough to switch over to the rust code. [mod.rs](http://mod.rs) has a _start_rust function that is called from the assembly. This is why we need the prefix:
#[no_mangle]
pub unsafe extern "C" _start_rust()
#[no_mangle] is needed to prevent the compiler from mangling the functions names. It usually does it to get a unique name for each function in the code base. extern "C" is needed to allow rust code to be called from the assembly. Check the rust embedded book for more info.
At this point, it's going to switch exception level.
If you're familiar with x86's ring, there's a similar concept in ARM called exception level. Exception levels are used to implement separation between kernel and user space. The levels are:
- 0 = user,
- 1 = kernel,
- 2 = hypervisor - the initial level
- 3 = Secure monitor (usually unused)
In this code, I switch to kernel level for a specific reason that I will discuss in a bit (spoiler: enabling mmu).
In case you're wondering why it's called "exception level" well, it's because it's mostly related to "exceptions" also known as interrupts. When something bad in the current level (say, user level) happens, the control of the system is passed to the higher exception level (kernel level). To switch back to the lower level, we need to "return" from the exception. This is done using the "eret" assembly function. This is also what we need to do to go from level 2 to level 1. We load the registers with data that we expect there and the last call from this function is arm::eret();.
After the setup is completed, we can start initializing our drivers. To get output we need the UART so it's not a surprise that it gets initialized first right before the logger. As explained later, for performance reasons, I used the mailbox to get the cpu's max clock rate and send another request to update the current clock rate to that value.
The main is called, but this crate has #[no_std] and #[no_main]: this function is just arbitrarily chosen. The kernel level initialization is completed, now we can request a framebuffer using the mailbox and start the game. 🎉
Make it work, make it right, make it fast!
Besides my intentional effort to avoid using the heap, I haven't put in much effort to make the game more efficient. Interestingly, it ran quite smoothly on my laptop (capped to 30fps). However, when I ran it on my Raspberry Pi for the first time, the game loop took 300ms to complete! My goal was to achieve 15 frames per second, which would mean around 66ms per frame. 15 fps or 1000/15 = 66ms.
Here are a few things that I tried, some of them helped some of them seemed ineffective though intuitively sound (to me). In the end, the loop was running in about 22ms at which point I've stopped profiling.
The first step was to understand what was taking time. To profile the code, I've added prints with time from the beginning of the loop to that point. Clearly, most of the time was spent in the clear and drawing phase.
Direct Memory Access (DMA)
I've also considered implementing support for DMA in order to efficiently transfer the back buffer to the front buffer.
DMA would likely have been beneficial in this scenario (although I'll never know for sure), but it honestly felt like a bit of a gamble. I attempted to find sample implementations, and they didn't appear overly complex, apart from involving numerous registers and options. The dilemma I faced was that investing time into implementing DMA, solely for the purpose of having a copy buffer function, could end up being wasted effort if the improvement didn't match my high expectations.
Furthermore, DMA tends to shine when used asynchronously. Since I hadn't implemented interrupts into my system, integrating code to manage the asynchronous aspect or opting for a synchronous implementation (similar to what I did with the mailbox) would have been necessary. However, I still wasn't entirely certain that DMA would provide the desired benefits in this context. As a result, I explored an alternative option.
Double Buffering, but fast!
My double buffering was fine on the desktop, but on the raspberry copy this huge array is very slow!
The Raspberry Pi's framebuffer supports an optimization called "panning." In this approach, we request a framebuffer with double the height of the physical screen. The currently undisplayed portion of the screen serves as the back buffer. After the drawing is done on this back buffer, we can use a mailbox request to inform the GPU to "pan" to the offscreen part of the buffer by changing the "virtual framebuffer height offset." This clever technique eliminates the need for a resource-intensive copy operation!

Single Instruction Multiple Data
SIMD (Single Instruction, Multiple Data) comprises special instructions that the compiler can utilize to enhance code's efficiency. These instructions function by executing a single instruction across multiple data elements. For instance, if we possess a vector or a substantial array requiring each element to be incremented by 4, employing SIMD would enable this task to be accomplished with just a single instruction, assuming the CPU supports such capabilities.
My idea was to use a SIMD to improve the efficiency of the buffer reset.
Raspberry Pi comes with the Nitro extension, which is essentially SIMD for the Arm architecture. However, I wasn't able to use it effectively. The reset operation had to be volatile, leading to screen flickering. This is my assumption, and I haven't delved further to explore how to use these capabilities more effectively.
This is a very nice post if you're curious about SIMD: https://thinkingeek.com/2021/08/22/raspberry-vectors-part-9/ and the specs can be found here https://developer.arm.com/documentation/den0018/a/.
In the end, I wasn't able to optimize this reset which currently looks like this:
let slice_ptr = (&mut self.raw_buffer()).as_mut_ptr();
for i in 0..self.single_screen_len() {
    unsafe {
        core::ptr::write_volatile(slice_ptr.add(i), 0);
    }
}
Turns out there is more hanging fruit, and this operation is already efficient enough.
Data and Instruction cache lines
Switching to kernel mode is mainly necessary because it permits enabling the Memory Management Unit (MMU) which is needed to enable the data and instruction caches.
Thanks to the cortex_a crate, enabling the MMU is as simple as SCTLR_EL1.modify(SCTLR_EL1::C::Cacheable + SCTLR_EL1::I::Cacheable);.
The performance improvement resulting from adding caching, as expected, was quite significant.
In the current state of the system (at commit d168b9), the typical time taken per loop cycle is around 33 ms. If I were to disable these caches, that time would increase to 76 ms per loop.
Overclocking
At Raspberry Pi's startup, it begins with a limited clock rate. This improvement is quite simple and requires just a couple of mailbox messages:
- Fetch the maximum clock rate.
- Set the desired clock rate.
And that's all it takes!
In the current ("final") system state, if I run the game without overclocking, it can still handle a cycle in around 33 ms. So, perhaps in this situation, it might not be a revolutionary change.
Inlining done wrong and how to do it right
In your favorite compiled programming language, when you want to call a function, the compiler will break it down into various instructions/steps to be followed:
- Write the function's arguments to the stack.
- Write the value of the PROCESS COUNTER plus 1 to the stack.
- Jumps to the function's location.
- Run the function's code.
- when the function is completed, execute "ret" function to pop the last stack frame and set the PC to the location on the stack.
This mechanism introduces some overhead.
Another option is to "inline" the function. Instead of jumping to that location, the compiler can decide to copy the function's instructions and place them directly in the spot of the function call. This way, you're effectively "running" the function's instructions but avoiding the overhead of jumping around. Quite interesting!
Each function call is substituted with the actual code of the function. Therefore, if you're only calling that function in a single location, there's still only one instance of these instructions. However, if the function is called from numerous different places, this results in duplicated instructions. This duplication can lead to an increase in both the size of your compiled binary and the compilation time.
During a specific phase of the game's development, I wanted to test it on a Raspberry Pi. As you might recall, the loop took approximately 300ms to execute, making the game unplayable. To address this, I began to add the 'inline' attribute to functions that, in my view, were critical to the hot-path. I immediately noticed an improvement in the delta time.
When I was doing the final optimizations, I really needed to find a way to go from 114 ms or 8 fps (very laggy game) to something around 66 ms or 15 fps (an "ok" game).
I first started by removing all inlines. The game was running very slowly. Then I started adding them back one by one, running the game after each change and seeing how the delta was doing. If there was no improvement, I simply removed it. It turns out that very few places were actually helping. If you grep the code, you can see there are very few places that are inlined.
I was quite surprised when, after introducing 'inline' to certain functions, the loop time actually increased by a significant amount. My assumption is that this could be attributed to branch mispredictions. This understanding played a crucial role in reducing the loop's duration to approximately 72ms from the earlier 114ms.
It is true: make it work, make it right, make it fast. "Make it fast" is last because it's (usually) hard to predict which code will need to be optimized.
Abstractions are cool when they're free
I added some abstractions here and there to make the code more readable. One of them was a Pixel, defined as coordinates and color. By removing this abstraction and limiting the use of the Coordinates struct, the final loop went from 72 ms down to something like 33 ms. I've also reworked some for loops to be more cache friendly to get it down to 26 ms per loop time.
In this case, the abstraction was only adding overhead when copying the data around, therefore, getting rid of it was the right call.
Running the project
Some final notes on how to run this thing.
Desktop
After checking out the repo, you can just open a terminal and use:
cargo run --package space_invaders --bin space_invaders --features std
to run space invaders on your desktop. Linux, Mac and Windows are supported.
Hardware
If you want to run on a Raspberry PI, then you will need:
- A Raspberry PI 3B+. Newer models might work after small tweaks
- An HDMI cable and monitor.
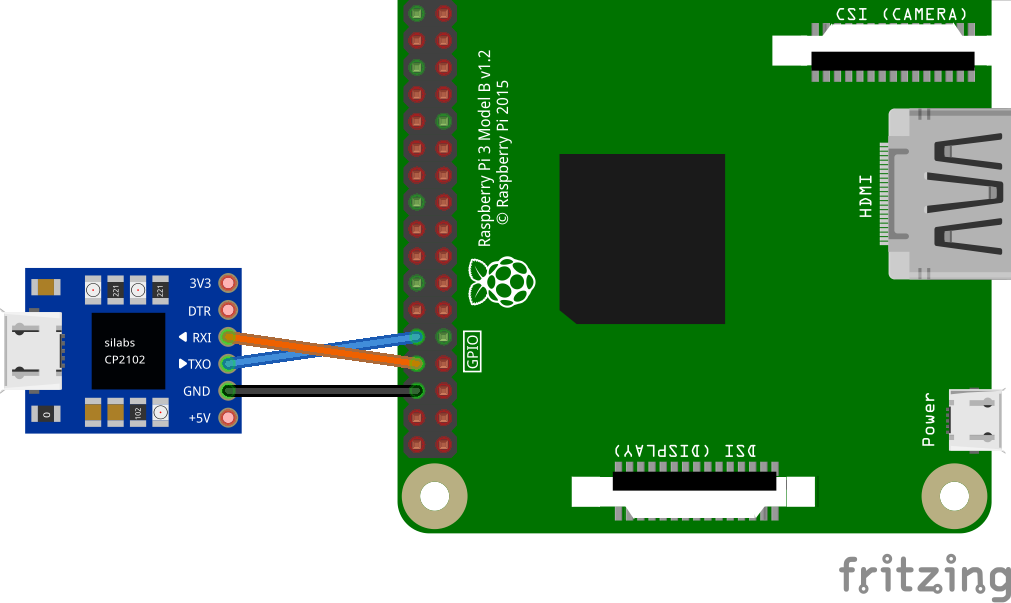
- A USB Serial Output connected to your Raspberry Pi and inserted in your laptop.
To run it on the hardware, I've been using the nice tools implemented in https://github.com/rust-embedded/rust-raspberrypi-OS-tutorials. The deal-breaker for me is the chainboot. Chain booting is essentially chain loading:
Chain loading is a method used by computer programs to replace the currently executing program with a new program, using a common data area to pass information from the current program to the new program. It occurs in several areas of computing.
So instead of building the kernel, mount the filesystem, copy the kernel there and powerup the system, using chainbooting there is a minimal kernel that will:
- read from uart
- write everything from input to a specific location (0x80_000, the start of the kernel)
- jump on the first kernel instruction.
This significantly cuts down time from building the kernel to running it on hardware.
Briefly:
- install Raspberry Pi OS (ex Raspbian) to an sd card.
- Download the repository.
- Replace kernel8.img in the sd with the one provided in the assets folder (assets/kernel8-chainboot.img) in the repo.
- Connect the usb serial output to Raspberry pi like the image below. Connect the HDMI as well.
- Run
make chainboot. - Connect the usb to your laptop and wait. After the transfer is completed, the screen will start showing space invaders!
QEMU
I haven't attempted to run this project on QEMU. Even though the make qemu command is available, setting up the display would require some additional configuration. I chose not to focus on making it work there because my previous experiences have shown that QEMU's emulation of the Raspberry Pi may not always be entirely accurate. As in, even if the project runs well on QEMU, it might not perform as expected on the actual hardware.
Conclusions
Well, this has been fun! This project is a side project out of an operating system I've been writing on the side for a while. As part of that, I've also written and released a vfat driver. In this project, I've implemented a Space Invaders on bare metal in Rust. The project is composed of the game and the kernel in two different crates. The game can be run on a desktop using the std feature flag. There are no dynamic allocations, and all features that were used at kernel level to support the game were the mailbox driver for getting a framebuffer from the GPU, a UART driver to get serial input and output and the timer driver to calculate the passage of time.
After quickly prototyping the game in std, I proceeded to implement the kernel side. Since I hadn't designed it with performance in mind, the game was running very slowly, therefore, I started exploring ways to enhance the game's speed. Implementing techniques like double buffering with panning, caching, inlining, and minimizing overhead significantly improved overall performance. Consequently, the game can now achieve a high frames per second (fps) rate, even though it's utilizing just a single CPU core.
I was able to reach the goals that I initially set for myself:
- Write a game for Raspberry Pi on bare metal, without using any operating system.
- Improve my knowledge in Operating Systems and embedded programming.
- Enhance my understanding of (unsafe) Rust.
- and finally, as a side effect, learn more about how to write games.
I've been interested in learning WebAssembly for a while, so maybe for sometime in the future, I would like to try to port this game there. Another idea I had considered but deferred for the future was to add an "online" global high score. At the end of the game, users can submit their scores to a backend. This would require adding some "screen" navigation on the game and an ethernet driver + tcp/ip stack on the kernel.
If you made it to this point, I would really like to thank you! If you have questions or comments, please reach out on Twitter, Mastodon or even via email. See you next time!
Acknowledgments
This project uses tools and knowledge from Andre Richter's excellent tutorial https://github.com/rust-embedded/rust-raspberrypi-OS-tutorials. In the rust community we are lucky to have a lot of cool OS projects, so these days it is super easy to get your hands dirty with OS development. The driver for the UART, make file and minipush were taken from the above repository.
Resources
- Operating Systems in three pieces: https://pages.cs.wisc.edu/~remzi/OSTEP/
- I was inspired by this project: https://github.com/isometimes/rpi4-osdev/blob/master/part6-breakout/kernel.c
- VideoCore IV: https://www.kernel.org/doc/html/v4.12/gpu/vc4.html
- rust unsafe code guidelines: https://rust-lang.github.io/unsafe-code-guidelines/introduction.html
- Nomicon is an amazing book about unsafe: https://doc.rust-lang.org/nomicon/intro.html
- Space Invaders assets: https://www.fontspace.com/category/space-invaders
- Philipp Oppermann's tutorial about os dev in rust: https://os.phil-opp.com/
- An embedded os written in rust, has lots of useful crates and patterns: https://github.com/tock/tock
- Another tutorial on building an OS for RPI from scratch has useful information around mailboxes: https://jsandler18.github.io/